

A Comprehensive Guide to the Light Microscope - How to Use a Light Microscope
Jul 9th 2023
Light microscopy is a fundamental tool in the field of biology and various other scientific disciplines. It enables scientists to visualize and study the intricate details of biological specimens at a cellular and subcellular level. By harnessing the properties of light, light microscopy techniques have revolutionized our understanding of the microscopic world.
What Is a Light Microscope?
A light microscope, also known as an optical microscope, is a scientific instrument that uses visible light to observe and magnify samples at a microscopic level. It is one of the most widely used tools in biological research, allowing scientists to study the structures and functions of cells, tissues, and other microscopic entities.
The basic principle behind a light microscope involves passing light through a sample and capturing the resulting image. The instrument consists of several key components, including a light source, condenser lens, objective lens, eyepiece, and a stage to hold the specimen.
The light source, typically a halogen lamp or an LED, emits light that passes through the condenser lens. The condenser lens focuses and directs the light onto the sample, illuminating it. The light then interacts with the sample, undergoing various interactions such as absorption, scattering, and reflection, depending on the nature of the specimen.
The objective lens, positioned near the sample, collects the light that has interacted with the specimen. It magnifies and forms an enlarged, real image of the specimen. The eyepiece, or ocular lens, further magnifies the image and allows the observer to view it. By combining the magnification of the objective lens and the eyepiece, the overall magnification of the image is determined.
Light microscopes can produce a wide range of magnifications, typically ranging from 40x to 1000x, or even higher with specialized objectives. Additionally, they can be equipped with different types of objectives to achieve various imaging capabilities, such as high-resolution, long working distance, or specialized contrast techniques.
One of the primary advantages of light microscopy is its versatility. It allows researchers to observe samples in real-time, providing dynamic information about cellular processes and interactions. Moreover, light microscopy techniques can be combined with various staining methods, immunolabeling, and fluorescent probes to enhance contrast and selectively visualize specific components within the sample.
While light microscopy excels in imaging transparent and stained samples, it does have limitations. The resolving power, or the ability to distinguish two closely spaced objects as separate entities, is limited by the wavelength of visible light. This restricts the level of detail that can be resolved, particularly for structures smaller than approximately 200 nanometers.
However, advancements in light microscopy, such as the development of super-resolution techniques like stimulated emission depletion (STED) microscopy and structured illumination microscopy (SIM), have pushed the resolution limits, enabling researchers to visualize subcellular structures and molecular complexes with greater detail.
What Are Light Microscopes Used For?
Light microscopes are used for a wide range of applications across various scientific disciplines. Here are some of the key uses of light microscopes:
Biological Research: Light microscopes are extensively employed in biological research to study cells, tissues, and organisms. They enable researchers to visualize and investigate cellular structures, cellular processes, and interactions. Light microscopy is crucial in fields such as cell biology, developmental biology, microbiology, and histology.
Medical Diagnosis: Light microscopes play a vital role in medical diagnostics. They are used to examine blood samples, body fluids, and tissue biopsies for identifying abnormal cells, pathogens, and other disease-related changes. Light microscopy is essential in fields like pathology, hematology, microbiology, and cytology.
Education: Light microscopes are extensively used in educational settings to teach students about cellular structures and the microscopic world. They are employed in schools, colleges, and universities to help students understand biology, anatomy, and other life sciences.
Quality Control and Industrial Applications: Light microscopes are used in industries for quality control and inspection purposes. They can be utilized to examine the quality and integrity of materials, analyze surface structures, measure particle sizes, and inspect manufacturing processes.
Forensic Science: Light microscopes are employed in forensic laboratories to analyze trace evidence such as fibers, hair, bloodstains, and fingerprints. They enable forensic scientists to identify and compare microscopic features, aiding in criminal investigations and legal proceedings.
Material Science: Light microscopy is utilized in material science to analyze the microstructure of materials. It helps researchers understand the properties, composition, and defects of materials at a microscopic level. This information is crucial for developing new materials and improving existing ones.
Environmental Science: Light microscopes are used in environmental science to analyze soil samples, water samples, and biological samples from ecosystems. They assist in studying microorganisms, pollutants, and ecological interactions, providing insights into environmental health and conservation.
Art Conservation: Light microscopes find application in art conservation and restoration. They are used to analyze pigments, study paint layers, identify authenticity, and examine the condition of artwork. This aids in preserving and restoring valuable cultural artifacts.
Nanotechnology: Light microscopes play a role in nanotechnology research, enabling scientists to visualize and manipulate nanostructures. Techniques such as near-field scanning optical microscopy (NSOM) and super-resolution microscopy contribute to the understanding and development of nanomaterials and nanodevices.
Astronomy: Light microscopes, particularly specialized variants like interference microscopes, can be employed in astronomy to study the surfaces of celestial objects, such as the moon and other planets. They aid in analyzing geological features and conducting comparative planetology.
These are just a few examples of the diverse applications of light microscopes. The versatility and accessibility of light microscopy make it a valuable tool across numerous scientific disciplines, facilitating discoveries, advancements, and practical applications in various fields of study.
Types of Light Microscopy
Bright Field Microscopy
Bright field microscopy is the most common and simplest form of light microscopy. It uses a bright light source beneath the sample, which illuminates the specimen, and the resulting image is formed by the contrast between the specimen and its surroundings. This technique is widely used for observing stained or naturally pigmented samples, such as cells or tissues.
Dark Field Microscopy
Dark field microscopy is a technique that enhances the contrast of transparent or unstained samples. It involves illuminating the specimen with oblique or scattered light, resulting in a bright image of the specimen against a dark background. This method is particularly useful for observing live, unstained microorganisms, such as bacteria or small protozoa.
Phase Contrast Microscopy
Phase contrast microscopy converts differences in the refractive index of a specimen into contrast, making transparent samples more visible. It uses a specialized condenser and objective lens to create phase shifts in the light passing through different parts of the specimen. This technique is commonly used in cell biology to observe living cells in culture.
Differential Interference Contrast (DIC) Microscopy
Differential interference contrast microscopy, also known as Nomarski interference contrast or simply DIC microscopy, is an optical imaging technique that enhances contrast in unstained samples. It uses polarized light and a specialized prism to create a 3D-like appearance of the specimen, enhancing details and structures. DIC microscopy is particularly useful for observing transparent specimens like living cells and tissues.
Polarized Light Microscopy
Polarized light microscopy utilizes polarized light to examine samples with anisotropic properties, meaning they interact differently with light waves in different directions. By rotating polarizers and analyzing how the light interacts with the sample, polarized light microscopy can provide information about crystal structures, birefringent materials, and mineral identification.
Fluorescence Microscopy
Fluorescence microscopy involves the use of fluorescent dyes or fluorescently labeled molecules to visualize specific structures or molecules within a sample. It employs a light source that excites the fluorescent molecules, causing them to emit light of a longer wavelength. This technique is widely used in cell biology, immunology, and molecular biology for studying cellular components and processes.
Immunofluorescence Microscopy
Immunofluorescence microscopy is a specialized application of fluorescence microscopy that combines the specificity of antibodies with fluorescent labeling. It allows researchers to visualize and localize specific antigens within cells or tissues. This technique is widely used in biomedical research and diagnostics.
Confocal Microscopy
Confocal microscopy employs a focused laser beam and a pinhole aperture to create high-resolution, optical sectioning of samples. By eliminating out-of-focus light, confocal microscopy produces sharp, detailed images of thin sections within thicker specimens. It is commonly used in biological research to examine cellular structures and dynamic processes.
Two-Photon Microscopy
Two-photon microscopy is an advanced fluorescence imaging technique that uses longer-wavelength, lower-energy photons to excite fluorescent molecules. It allows for deep tissue imaging with minimal photo damage, making it suitable for live imaging of thick samples and even intact organisms. Two-photon microscopy is widely used in neuroscience and developmental biology.
Light Sheet Microscopy
Light sheet microscopy, also known as selective plane illumination microscopy (SPIM), illuminates the sample with a thin sheet of light perpendicular to the imaging axis. By capturing images from the side, this technique reduces phototoxicity and provides fast, high-resolution, 3D imaging of large specimens. Light sheet microscopy is especially valuable for imaging embryos, organoids, and transparent organisms.
Total Internal Reflection Fluorescence Microscopy (TIRF)
Total internal reflection fluorescence microscopy exploits the phenomenon of total internal reflection to selectively illuminate and image the near-surface region of samples. By using a high-angle incident beam of light, only fluorophores in close proximity to the sample surface are excited and detected, providing exceptional spatial resolution and minimizing background fluorescence.
Expansion Microscopy
Expansion microscopy is a relatively new technique that physically expands biological samples to achieve higher resolution imaging using conventional microscopes. It involves embedding the sample within a swellable polymer matrix and subsequently expanding it. By expanding the sample uniformly, expansion microscopy enables the imaging of fine structures with diffraction-limited microscopes.
These various types of light microscopy techniques provide researchers with a diverse range of tools for visualizing and studying samples at different scales, from cells and tissues to subcellular structures and molecular interactions. Each technique has its own strengths and applications, allowing scientists to delve deeper into the mysteries of life.
Parts of a Light Microscope
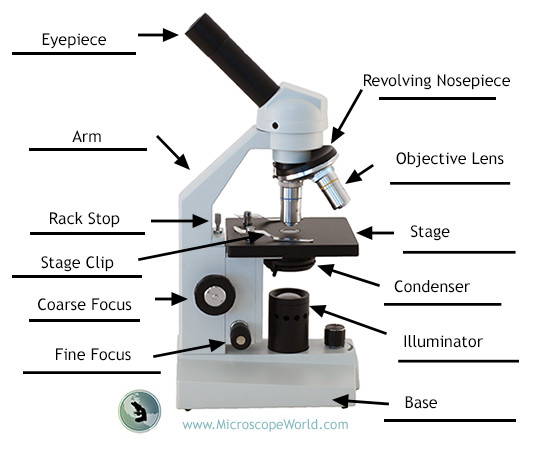
A light microscope consists of several essential parts, each playing a specific role in the functioning of the instrument. Here are the main components of a typical light microscope:
Eyepiece/Ocular: The eyepiece, also known as the ocular, is the lens closest to the observer's eye. It typically magnifies the image formed by the objective lens and allows the observer to view the specimen. Eyepieces are often interchangeable and can vary in magnification.
Objective Lenses: The objective lenses are a set of lenses positioned close to the specimen. They gather and magnify the light that passes through the sample, creating an enlarged image. Microscopes usually have multiple objective lenses with different magnification powers, such as 4x, 10x, 40x, and 100x. They are typically mounted on a rotating turret, allowing the user to switch between objectives easily.
Stage: The stage is a flat platform that holds the specimen being observed. It may include clips or mechanical stages to secure the specimen in place. The stage can be moved vertically or horizontally to position the specimen for examination. Some microscopes also have a stage control mechanism to precisely move the stage in different directions.
Condenser: The condenser is located below the stage and plays a crucial role in focusing the light onto the specimen. It consists of a series of lenses that concentrate and align the light source to provide uniform illumination of the specimen. The condenser can often be adjusted in height or aperture size to control the intensity and angle of the light.
Illumination Source: The illumination source provides the light that passes through the specimen. It is typically located in the base of the microscope and may consist of a halogen lamp, LED, or other light sources. The illumination can be transmitted through the sample (transmitted light microscopy) or directed onto the sample from above (reflected light microscopy).
Diaphragm/Iris: The diaphragm, also known as the iris, is a circular aperture located within the condenser. It controls the amount of light passing through the specimen. By adjusting the diaphragm, the user can regulate the intensity and contrast of the image.
Focus Knobs: Light microscopes have two focus knobs, one for coarse adjustment and the other for fine adjustment. These knobs move the stage or objective lenses vertically to bring the specimen into sharp focus. The coarse adjustment knob is used initially to bring the specimen into view, while the fine adjustment knob provides precise focusing.
Body Tube: The body tube connects the eyepiece to the objective lenses. It contains a series of lenses that further magnify and transmit the image from the objective to the eyepiece. In some microscopes, the body tube can be extended or tilted for user comfort and ergonomic positioning.
Arm: The arm is the curved or angled portion of the microscope that connects the body tube to the base. It provides structural support and allows the user to carry and manipulate the microscope.
Base: The base of the microscope serves as a stable platform that supports the entire instrument. It often contains the illumination source, power switch, and electrical controls. The base helps maintain the stability of the microscope during usage.
These are the primary components of a light microscope, though additional features and accessories may vary depending on the specific model and intended applications. The combination of these parts allows researchers and students to explore the microscopic world and study various specimens with enhanced magnification and clarity.
Deconvolution In Light Microscopy
Deconvolution in light microscopy is a computational image processing technique used to enhance the resolution and clarity of images obtained from optical microscopes. It is particularly valuable for improving the quality of images affected by factors like optical aberrations, limited depth of field, and light scattering.
The process of deconvolution involves reversing the effects of image degradation caused by the optical system and restoring the original, sharper image. It is based on the understanding that the image captured by the microscope is a convolution of the true specimen with the microscope's point spread function (PSF). The PSF describes how a single point source appears as an image after passing through the microscope's optical system.
By applying deconvolution algorithms, it is possible to estimate the original specimen from the blurred image. Deconvolution methods typically involve iterative mathematical calculations that try to find the most likely specimen that, when convolved with the microscope's PSF, produces an image closest to the acquired data.
Deconvolution algorithms can be implemented through various mathematical approaches, such as maximum likelihood estimation (MLE), Richardson-Lucy algorithm, or Wiener deconvolution. These algorithms take into account factors like noise, signal-to-noise ratio, and the characteristics of the microscope system to iteratively refine the estimated specimen.
The benefits of deconvolution in light microscopy are numerous. It can enhance resolution and detail, resulting in sharper and more accurate images. Deconvolution helps to mitigate the effects of optical blur, allowing for better visualization of fine structures and subcellular details. It also improves the ability to discern overlapping structures, increasing the accuracy of quantitative analysis and measurements.
It's important to note that deconvolution is most effective when applied to images that are acquired with appropriate settings, such as sufficient signal intensity, optimal exposure times, and minimal photobleaching. Additionally, deconvolution may amplify noise and artifacts present in the original image, so noise reduction techniques and proper calibration are often employed alongside deconvolution algorithms.
Deconvolution has become a powerful tool in modern microscopy, particularly in techniques like confocal microscopy, wide-field fluorescence microscopy, and other super-resolution imaging methods. It allows researchers to extract more information and obtain higher quality images, ultimately advancing our understanding of biological structures, dynamic processes, and cellular interactions.
How to Use a Light Microscope Steps
Step 1: Connect the light microscope to a power source, unless a mirror is used for illumination. In such cases, choose a location with ample natural light.
Step 2: Rotate the revolving nosepiece to align the lowest objective lens.
Step 3: Prepare your specimen by placing a coverslip to ensure proper protection before mounting it onto the stage.
Step 4: Secure the slide using the metal clips, ensuring the specimen is centered beneath the lowest objective lens.
Step 5: Peer into the eyepiece and gradually adjust the coarse adjustment knob to bring your specimen into focus. Be cautious to avoid contact between the slide and the lens.
Step 6: Optimize the condenser for the highest light intensity. Adjust the diaphragm beneath the stage if necessary, particularly when using the low power objective.
Step 7: Continue to refine the focus by gently manipulating the fine adjustment knob until a sharp image of your specimen is achieved.
Step 8: Thoroughly examine your specimen.
Step 9: When finished with the lowest power objective, switch to the medium power objective and readjust focus using the fine adjustment knob.
Step 10: Once focused, transition to the high-power objective for further examination.


