Tips for Optimizing Microscope Illumination
May 3rd 2018
When setting up a compound microscope, it is important to optimize the illumination in order to produce clear and crisp images. There are four areas that should be considered when setting up the microscope illumination.
 #1 - Microscope Rheostat
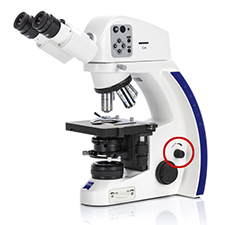
The microscope rheostat control can be found on the side of the compound microscope body. It will typically be a knob that is turned clockwise in order to increase the light intensity, or counter-clockwise to reduce the light. The image at left shows the rheostat control on the Zeiss digital Primostar microscope circled in red. Some microscopes have a recessed dial that is rotated to the right to increase the intensity and to the left to decrease light intensity.
#2 - Using a Light Filter
Depending what type of illumination your compound microscope has, you may need to use a daylight balancing filter. This is a blue filter and it usually sits directly on top of the illuminator, or in a filter holder above the light. If your microscope has tungsten or halogen illumination, the daylight balancing filter will correct the color temperature and result in a better quality image (and a better color image). If you have an LED microscope, this blue filter will not be needed. Microscopes that have LED illumination have a color temperature that is already high and does not need to be adjusted. The image below shows what your microscopy image may look like if you have a tungsten or halogen microscope and are not using a daylight balancing filter (left) versus what it will look like if you are using the daylight balancing filter (right).

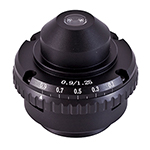
#3 - Adjusting the Aperture Diaphragm Beneath the microscope stage you will find the microscope condenser. The condenser has an iris diaphragm (also known as an aperture diaphragm) that can be adjusted to match the numerical aperture (NA) of the objective lens. The NA is typically typed on the side of each objective lens. Most condensers have a scale with similar numbers on them along with a lever or slider to adjust the aperture. If your objective lenses do not have the NA typed on them, below are some guidelines for adjusting the aperture diaphragm for each objective lens.
- 4x objective = Aperture of iris should be nearly closed to 1/8 open.
- 10x objective = Aperture of iris should be somewhere between 1/8 - 1/4 open.
- 40x objective = Aperture of iris should be somewhere between 1/4 - 1/2 open.
- 100x objective = Aperture of iris should be somewhere between 1/2 - 3/4 open.
#4 - Adjusting the Field Diaphragm
If your microscope has Köehler illumination, you will want to make sure you adjust the field diaphragm for optimal contrast. You can read an in-depth article here that explains how to set up your microscope for optical Köehler illumination and adjust your field diaphragm.
The four tips listed above should allow you to use your microscope to its potential - for crisp, clear, high quality images. If you have questions about adjusting your microscope illumination, contact Microscope World and we will be happy to help.
Thank you to Motic microscopes for providing the microscopy filter images.


