

Koehler Microscope Illumination
Sep 14th 2017
Koehler illumination is obtained by focusing and centering microscopy light on the field of view in order to increase contrast and resolution. Koehler illumination was first introduced in 1893 by August Köhler of the Carl Zeiss corporation as a method of providing optimum specimen illumination. Microscope manufacturers have since designed microscopes with Koehler illumination so the collector lens and other optical components will project an enlarged and focused image of the lamp filament onto the plane of the aperture diaphragm of a properly positioned substage condenser, resulting in higher contrast and resolution images.
 Many high quality advanced microscopes that are made with Koehler illumination, if not set up properly, will fail to yield the highest quality images the microscope is capable of. Follow the steps below in order to set up Koehler illumination properly.
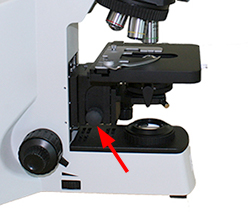
1. Place a high contrast slide on the stage, turn on the light and move the 4x or 10x objective lens into position. Set the rheostat control for the light so it is at a comfortable illumination and not overly bright for your eyes. Adjust the condenser height (adjustment knob shown at left) so the top of the condenser is about 0.5cm from the bottom of the microscope slide.
2. Adjust the condenser iris diaphragm (located on the front of the condenser) so it is closed down almost all the way. This will create a dark circle around your image when you look through the eyepieces. Make sure this dark image is centered in the field of view. If the dark circle is off to one side, use the condenser centering screws (Figure 5b below) to center the condenser so the image is directly in the middle of your field of view.
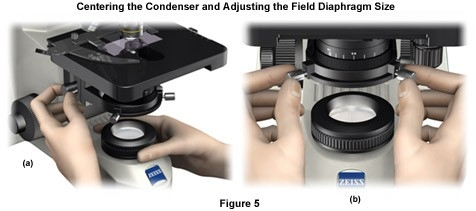
3. Adjust the light iris diaphragm (figure 5a) so that as you start to close the diaphragm you can see the slight dark edges of the iris in your field of view. Keep the edges of this iris on the outside of your circular image. Closing this diaphragm down slightly is going to increase contrast in your image.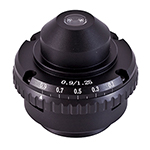 4. Adjust the condenser iris diaphragm to match the NA of the objective lens being used. In the image at left you can view the front of the condenser that is adjustable and labeled with numbers 0.9, 0.7, etc. These numbers are meant to be placed into position to match the NA (printed on your objective lens) when it is in use. Some condensers rather than listing the NA on the slider, will list the objective lens values such as 4x, 10x, 40x, 100x. Positioning the iris diaphragm in the proper position based on the objective lens being used is going to ensure that optimum image resolution and contrast is obtained.
If you are looking for a biological microscope with Koehler ilumination below are a few options:
If you have questions regarding Koehler illumination or setting up your microscope correctly contact Microscope World.


